In this series of tutorials, we will explore some optimization techniques to create a fully blitted Asteroids style game. Although the game we will create will be a relatively simple version of Asteroids, the techniques we will use to optimize it will be advanced. We will explore these optimization techniques:
- Pre-calculating and storing rotation and thrust delta x and delta y values in an array (so they don’t need to be calculated on the fly)
- Pre-caching sprite rotation animations in an array of BitmapData objects
- Using one display object to “blit” (bit block transfer) all graphic images to.
In part 1, we will tackle all three of these and get the player ship moving about the screen. In part 2, we will add in blitted asteroid rocks animations. In part 3, we will add blitted ship missiles. In part 4, we will add the bitmap collision detection a simple particle emitter and a pool/farm of particles.
I am modeling some of my graphics for this game from the Atari 7800 version of Asteroids. I am doing this because I want to create a version that might be familiar to some people but also because I don’t plan to license or sell this game. If you plan to use this as a base for a game that you will submit for license opportunities, then you must change all of the graphics.
Getting Started
Usually I would create a series of classes for a game like this, but to show an optimized game, and for space reasons, I will forego this. I am going to create the entire game in one class called Main. I don’t plan to use any other classes for game objects.
Main will be the “document class” of my .fla file. In my library for part 1, I have 4 basic objects:
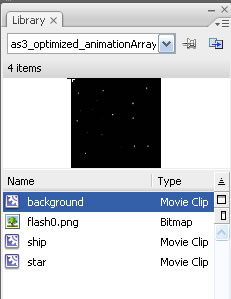
The background is a 400×400 vector image of a black sky and various stars. It has a linkage id of Background. I want a semi-complicated background to show how to blit game objects on top with transparency. This is not the most complicated image, but it has enough detail for a demonstration. The stars are made with the white circle clip called star.

The player ship is a 20×20 png I imported called flash0.png. I actually will rename this later. This ship png file has been placed inside ship movieClip a -10,-10. The clip has an linkage id of Ship. We have placed it at its center on on 0,0. That will be the point of rotation.

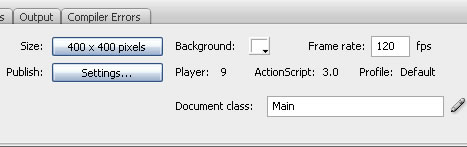
The stage for the game is 400×400 with a white background, running at 120FPS. The 120 is important because it will allow us to “pre-cache” our animations as fast as our plug-in version will allow. The document class will be called Main.
The Main class
The Main class will be stored in a file called Main.as. We will go over some specific parts of the class next in detail. Afterward, I will give the full text of the current version for part one and the .fla file for download.
[cc lang=”javascript” width=”550″]
package {
import flash.display.Bitmap;
import flash.display.MovieClip;
import flash.events.TimerEvent;
import flash.utils.Timer;
import flash.display.BitmapData;
import flash.geom.*;
import flash.events.KeyboardEvent;
public class Main extends MovieClip {
var aRotation:Array=[];
var aShipAnimation:Array=[];
var shipAnimationArrayLength:int;
var ship:Ship;
var shipHolder:MovieClip;
var animationTimer:Timer;
var animationCounter:int;
var playerObject:Object;
var canvasBD:BitmapData;
var canvasBitmap:Bitmap;
var backgroundBD:BitmapData;
var backgroundSource:Background;
var gameTimer:Timer;
var backgroundRect:Rectangle;
var backgroundPoint:Point;
var playerRect:Rectangle;
var playerPoint:Point;
var aKeyPress:Array=[];
var spriteHeight:int=20;
var spriteWidth:int=20;
public function Main() {
trace(“main”);
createObjects();
createRotationArray();
createShipAnimation();
}
[/cc]
The Main() constructor initializes the game by creating objects, and caching values and Bitmaps needed for rotation and animation. There are quite a few imported classes and variables that need initializing. I will go into detail on their use in the following sections.
[cc lang=”javascript” width=”550″]
private function createObjects():void {
//create generic object for the player
playerObject=new Object();
playerObject.arrayIndex=0;
playerObject.x=200;
playerObject.y=200;
playerObject.dx=0;
playerObject.dy=0;
playerObject.movex=0;
playerObject.movey=0;
playerObject.acceleration=.3;
playerObject.maxVelocity=8;
playerObject.friction=.01;
playerObject.centerx=playerObject.x+spriteWidth;
playerObject.centery=playerObject.y+spriteHeight;
playerRect=new Rectangle(0,0,spriteWidth2,spriteHeight2);
playerPoint=new Point(playerObject.x,playerObject.y);
//init canvas and display bitmap for canvas
canvasBD=new BitmapData(400,400,false,0x000000);
canvasBitmap=new Bitmap(canvasBD);
//init background
backgroundSource=new Background();
backgroundBD=new BitmapData(400,400,false,0x000000);
backgroundBD.draw(backgroundSource,new Matrix());
backgroundRect=new Rectangle(0,0,400,400);
backgroundPoint=new Point(0,0);
}
[/cc]
The createObjects() method begins by using a generic object called playerObject to hold attributes for our player ship.
playerObject.arrayIndex=0;
This is the current index of animation for the player. We will store 36 individual BitmapData images an array and this will be the index of that array to use for display. We will also store a pre-calculated array of delta x and delta y values for thrusting and firing to each of these 36 angles. This index will be used in that array also.
playerObject.x=200;
playerObject.y=200;
We will start that player at 200,200 on the screen. These will store the players x and y values as he moves across the play screen.
playerObject.dx=0;
playerObject.dy=0;
These hold the current delta x and delta y values for the player associated with the direction he is floating on the screen. Since the player is not floating at the beginning of the game, these values are set to 0.
playerObject.movex=0;
playerObject.movey=0;
These hold the current speed and direction that the player is heading. This combines the current acceleration with current direction and speed of the player ship.
playerObject.acceleration=.3;
This is the number of pixels added to the player x and y values when the UP arrow is pressed.
playerObject.maxVelocity=8;
This will limit the maximum speed of the ship in any x or y direction.
playerObject.friction=.01;
Air friction is added each frame to the player ship so inertia will not have it float on forever with out more acceleration.
playerObject.centerx=playerObject.x+spriteWidth;
playerObject.centery=playerObject.y+spriteHeight;
We will keep a calculation of the center x and y of the player because the current x an y represent the top left corner of the ship Bitmap. We need the center value to make calculations easier.
playerRect=new Rectangle(0,0,spriteWidth2,spriteHeight2);
playerPoint=new Point(playerObject.x,playerObject.y);
The playerRect and playerPoint are used in blitting with copyPixels to our display canvas. We pre-create these so they don’t need to be created each frame.
Next we create a canvas to blit all of our game objects to.
//init canvas and display bitmap for canvas
canvasBD=new BitmapData(400,400,false,0x000000);
canvasBitmap=new Bitmap(canvasBD);
The canvasBD is a non transparent BitmapData object that will hold the current display. canvasBitmap is the only display object in the game. It holds the canvas, which in turn holds the ship and the background blitted images.
Finally, we create our background image.
//init background backgroundSource=new Background();
backgroundBD=new BitmapData(400,400,false,0x000000);
backgroundBD.draw(backgroundSource,new Matrix());
backgroundRect=new Rectangle(0,0,400,400);
backgroundPoint=new Point(0,0);
The background is initialized by creating an instance of the Background object in the library. It is a 400×400 non-transparent vector MovieClip. Because the background is a vector in the library, it needs to be drawn onto the backgroundBD with the draw() method. The backgroundRect and backgroundPoint are pre-created and pre-calculated to save cycles when we blit this back to the canvasBd each frame.
[cc lang=”javascript” width=”550″]
private function createRotationArray():void {
shipAnimationArrayLength=36;
var rotation:int=0;
for (var ctr:int=0;ctr
var tempObject:Object={};
tempObject.dx=Math.cos(2.0Math.PI(rotation-90)/360.0);
tempObject.dy=Math.sin(2.0Math.PI(rotation-90)/360.0);
trace(ctr+”:dx=” + Math.cos(2.0Math.PI(rotation-90)/360.0));
trace(ctr+”:dy=” + Math.sin(2.0Math.PI(rotation-90)/360.0));
aRotation.push(tempObject);
rotation+=10;
}
trace(“aRotation[5].dx=” + aRotation[5].dx);
}
[/cc]
The createRotationArray() method is used to pre-calculate the delta x and delta y value for rotation and movement at a specific angle. The 36 angles we will create correspond to the 360 degrees in a circle, taken in 10 degree increments. If you want more precise rotation animation, you can change the shipAnimationArrayLength to be a multiple of 36 (such as 180. If you do that, you will need to change the rotation+=10; to rotation+=2; (180*2=360). The product of the 2 much be equal to 360. The loop calculates to dx and dy values in radians and places them into a generic object and then pushes that generic object into the aRotation array;
[cc lang=”javascript” width=”550″]private function createShipAnimation():void {
shipHolder=new MovieClip();
shipHolder.x=50;
shipHolder.y=50;
ship=new Ship();
ship.x=spriteWidth;
ship.y=spriteHeight;
shipHolder.addChild(ship);
addChild(shipHolder);
animationCounter=0;
animationTimer=new Timer(1,36);
animationTimer.addEventListener(TimerEvent.TIMER, cacheShip);
animationTimer.addEventListener(TimerEvent.TIMER_COMPLETE, animationTimerCompleteHandler);
animationTimer.start();
}
[/cc]
The createShipAnimation() sets up our timer based cache of the ship. The ship will start at rotation=0 and be moved 10 pixels each iteration until all 36 rotated images can be placed in an array of BitmapData objects. First we create a display object (in this case a MovieClip) to hold the Ship from our library. We do this because if we simply added the ship to the display list and tried to rotate it, Flash would not cache the rotations and we would get 36 BitmapData objects of the Ship pointed up (the original position). Also, a BitmapData object uses only the positive portion of the coordinate system. To rotate an object around its center, 1/2 of it needs be be in the negative x and y space. So, we placed the ship at -10,-10 in its MoveiClip, but we can’t just cache that because even if the rotation worked, it would only cache 1/2 of our ship (the portion in the positive coordinate space). So, we place the ship in the shipHolder, and then rotate the ship inside the shipHolder to get a clean rotation.
We create a Ship object called ship and place it at spriteWidth, spriteHeight. Those have been preset to be 20,20. The reason we do this to to accommodate for the changes in width and height as the ship is rotated. To be safe, use double the ships actual height and width as the size of the BitmapData to cache. So, we put the ship at 20,20 in a 40×40 BitmapData object and it has the freedom rotate without clipping the corners.. The ship is added to the shipHolder display list and the shipHolder to the main timeline display list.
Next, we create an timer object and some events that will allow us to move through 36 ticks of animation as fast as the frame rate will allow. On each of the 36 ticks, we call the cacheShip method, and when all 36 are complete, we call the animationTimerCompleteHandler.
[cc lang=”javascript” width=”550″]private function cacheShip(e:TimerEvent):void {
var spriteMapBitmap:BitmapData=new BitmapData(spriteWidth2,spriteHeight2,true,0x00000000);
spriteMapBitmap.draw(shipHolder,new Matrix());
aShipAnimation.push(spriteMapBitmap);
trace(“caching ” + animationCounter);
animationCounter++;
ship.rotation+=10;
}
private function animationTimerCompleteHandler(e:TimerEvent):void {
startGame();
}
[/cc]
After all of the set up, the cacheShip method is relatively simple. On each of the 36 timer events (ticks), it creates a new Bitmapdata object called spriteMapBitmap that is 40×40 (or the spriteWidth * 2, spriteHeight *2) and is transparent. Next it takes the current contents of the shipHolder movie clip and calls the draw() method of the BitmapData class to place it inside the fresh spriteMapBitmap Bitmapdata object. Its last jobs are to push the new BitmapData object to the ship’s array pf animation frames (aShipAnimation), and set the ship up for the next frame by increasing the rotation by 10 (ship.rotation+=10);
The animationTimer calls the animationTimerCompleteHandler when it has moved through all 36 timer ticks. We are now complete with part 1’s animation caching, and will now move onto the beginning of our game loop. We will have more animation and Bitmap Caching to perform as we add the rocks, and missiles, and the simple particle explosions.
[cc lang=”javascript” width=”550″]
private function startGame():void {
removeChild(shipHolder);
addChild(canvasBitmap);
stage.addEventListener(KeyboardEvent.KEY_DOWN,keyDownListener);
stage.addEventListener(KeyboardEvent.KEY_UP,keyUpListener);
gameTimer=new Timer(50);
gameTimer.addEventListener(TimerEvent.TIMER, runGame);
gameTimer.start();
}
private function runGame(e:TimerEvent) {
checkKeys();
updatePlayer();
drawBackground();
drawPlayer();
}
[/cc]
The startGame() method begins the actual game loop. The loop is a method called runGame and it is called every 50 milliseconds. This can be increased or decreased as needed. We do this with the new AS3 Timer class here, but I have also had success with using the EnterFrame event. We also add a listener for both keyboard up and down events, remove the shipHolder from the main time line, and add in our canvas. The canvas is just a 400×400 BitmapData holder that all of our BitmapData images will be drawn to. It is the ONLY display object in the game.
The runGame method is currently pretty basic. It runs through checking for changes in keyboard input, updating the player ship position based on any key changes, and inertia, then it draws our objects to the screen in the order desired. First we draw the space star background, and then we draw the player. Effectively this is akin to setting depths on them in AS2.
[cc lang=”javascript” width=”550″]
private function keyDownListener(e:KeyboardEvent) {
//trace(“down e.keyCode=” + e.keyCode);
aKeyPress[e.keyCode]=true;
}
private function keyUpListener(e:KeyboardEvent) {
//trace(“up e.keyCode=” + e.keyCode);
aKeyPress[e.keyCode]=false;
}
private function checkKeys():void {
if (aKeyPress[38]){
trace(“up pressed”);
playerObject.dx=aRotation[playerObject.arrayIndex].dx;
playerObject.dy=aRotation[playerObject.arrayIndex].dy;
var mxn:Number=playerObject.movex+playerObject.acceleration(playerObject.dx);
var myn:Number=playerObject.movey+playerObject.acceleration(playerObject.dy);
var currentSpeed:Number = Math.sqrt ((mxnmxn) + (mynmyn));
if (currentSpeed < playerObject.maxVelocity) {
playerObject.movex=mxn;
playerObject.movey=myn;
} // end speed check
}
if (aKeyPress[37]){
playerObject.arrayIndex ;
if (playerObject.arrayIndex <0) playerObject.arrayIndex=shipAnimationArrayLength-1;
}
if (aKeyPress[39]){
playerObject.arrayIndex++;
if (playerObject.arrayIndex ==shipAnimationArrayLength) playerObject.arrayIndex=0;
}
}
[/cc]
To avoid the pause created when a key is held down (the old key.up and key.down global methods have been removed in AS3) we have created an array called aKeyPress that will act somewhat like those global methods. When a key is pressed ( the UP arrow keyCode= 38, the LEFT arrow keyCode= 37, and the RIGHT arrow keyCode= 39) we store a Boolean true in our array at that index. When the the key is not pressed anymore, we store a Boolean false in the index of the aKeyPress array.
The checkKeys() method is actually quite complicated because it contains most of our logic for the rotation and forward motion of the ship.
First, if the up arrow is being held down : if (aKeyPress[38]) : we need to check what the dx (delta x) and dy (delta y) values are for that direction. We already pre-calculated all of these and placed them in the aRotation array. The current index for the player, playerObject.arrayIndex holds a number 0 to 35 referring to the current rotated position of the playerObject. That same index is used in the aRotation array to find the .dx and .dy values that will be applied to the playerObject.movex and playerObject.movey variables. When the game starts, the playerObject.movex and playerObject.movey values are both set to 0, but as soon as the up arrow is pressed we start to calculate what the new movex and movey values will be. That is done with these two lines:
var mxn:Number=playerObject.movex+playerObject.acceleration(playerObject.dx);
var myn:Number=playerObject.movey+playerObject.acceleration(playerObject.dy);
We create two temp variables to hold our new movex and movey values called mxn and myn. To create the new value we add our acceleration value (.3) * the new dx value and add it to the current movex value. We also do this with myn, the dy and movey values. These now equal our new delta x and y values or the change in x and y that will be applied to our x and y values respectively when the ship is put on the screen this frame timer tick. But wait a minute, we have something called playerObject.maxVelocity which keeps out ship from accelerating so fast that we can’t see it.
Our next step is to test the mxn and myn values against the max velocity. To get our current speed we must use a little math. This is because we have essentially two vectors in dx and dy and we must add them together and take their square root of their squares to find a number that is our current constant velocity. That is done here:
var currentSpeed:Number = Math.sqrt ((mxnmxn) + (mynmyn));
Now, our currentSpeed is a value that we can compare to our playerObject.maxVelocity value, if it is less than our max, we assign the playerObject.movey and movex to the respective mxn and myn values. If it is not (the ship is moving at the max velocity), we do nothing and the movex and movey remain unchanged and our ship continues to move in its current direction at max velocity.
The last two key checks are for the left and right arrow keys. If the left arrow is pressed, we change the playerObject.arrayIndex by subtracting one from it. If it goes below zero, we set it to the 35 (array length of 36 – 1). If we press the right arrow key, we do the opposite and add 1 to the playerObject.arrayIndex. If it goes above 35, we set it to be 0. We don’t change the playerObject.dx and dy values yet. If we did that, then the ship would start to move off in the direction we rotate too, and not continue its inertia in the current thrusted direction. We only change the playerObject.dx and dy, and the movex and movey when the up arrow is pressed. This gives us an approximation of the classic Asteroids movement. I have no idea how Ed Logg actually programmed Asteroids, so I have to assume this is relatively close.
[cc lang=”javascript” width=”550″]
private function updatePlayer():void {
//add friction
if (playerObject.movex > 0) {
playerObject.movex-=playerObject.friction;
}else if (playerObject.movex < 0) { playerObject.movex+=playerObject.friction; } if (playerObject.movey > 0) {
playerObject.movey-=playerObject.friction;
}else if (playerObject.movey < 0) { playerObject.movey+=playerObject.friction; } playerObject.x+=(playerObject.movex); playerObject.y+=(playerObject.movey); playerObject.centerx=playerObject.x+spriteWidth; playerObject.centery=playerObject.y+spriteHeight; if (playerObject.centerx > stage.width) {
playerObject.x=-spriteWidth;
playerObject.centerx=playerObject.x+spriteWidth;
}else if (playerObject.centerx < 0) { playerObject.x=stage.width – spriteWidth; playerObject.centerx=playerObject.x+spriteWidth; } if (playerObject.centery > stage.height) {
playerObject.y=-spriteHeight;
playerObject.centery=playerObject.y+spriteHeight;
}else if (playerObject.centery < 0) {
playerObject.y=stage.height-spriteHeight;
playerObject.centery=playerObject.y+spriteHeight;
}
trace(“centerx=” + playerObject.centerx);
}
[/cc]
We are hitting the home stretch of part 1 now. The updatePlayer() method is called every interval in our game loop to make sure that the ship is placed on the screen at the correct location. That location changes most interval ticks because we simulate inertia and friction with this function. The first thing we do is add friction with the appropriate sign to each of the movex and movey values. We ADD the friction value to a negative value and SUBTRACT it from a positive value. We do this each frame, and eventually, if the up arrow if not pressed again, the ship will stop moving.
Next, we add the movex and movey values to the current x and y values for the playerObject. This simulates our inertia. The x and y values are changed every tick no matter if the up arrow is pressed or not. We also recalculate the centerx and centery values for the playerObject.We need these recalculated every time the x and y values change to ensure that we have a proper center of our object. This is used for warping from left to right and up and down, but also used in collision detection and explosion placement. We don’t want to use the upper left-hand corner x and y values for these calculations.
Next we check the centerx value against the stage.width value. If the centerx is greater than stage.width, we place the ship at the other side of the screen at -spriteWidth. That gives the illusion that the ship is floating from the right side to the left side of the screen. We do the same with the x value and the left side of the screen by checking if the centerx is less than 0, and then changing the it to be the stage.width – the spriteWidth. We do this in the y direction by checking the centery values also.
[cc lang=”javascript” width=”550″]
private function drawBackground():void {
canvasBD.copyPixels(backgroundBD,backgroundRect, backgroundPoint);
}
private function drawPlayer():void {
playerPoint.x=playerObject.x;
playerPoint.y=playerObject.y;
canvasBD.copyPixels(aShipAnimation[playerObject.arrayIndex],playerRect, playerPoint);
}
[/cc]
We have made it to the last two methods in part one. Every frame tick, with the drawBackground() method, we need to redraw the background image, and this is done by using the copyPixels() method of the canvasBD BitmapData object We copy all of the pixels from the backgroundBD BitmapData object to the canvasBD by specifying the pre-calculated rectangle of 0,0,400,400 and always using the point 0,0.
The drawPlayer() method is slightly more complicated. We need to first set the playerPoint x and y values to equal the current playerObject x and y values. Once we have done that, we again call the copyPixels method of the canvasBD. This time we specify the current ship animation frame in the aShipAnimation array using the playerObject.arrayIndex value. Then we use the pre-calculated rectangle of 0,0,40,40 and the point calculated above.
If all of that code is correct, we get the below exported .swf file. Use the up arrow to apply the thrust, and the right and left arrows to simulate the rotation of the ship.
The source files are here: 7800 Asteroids Tutorial Part 1 source files