One of the most useful advances in Flash 8 and CS3 for game developers has been the use of raw bitmap data to render on screen images. The CS3 / AS3 implementation has been changed from AS2, so this tutorial will go through the basics of creating, loading, and displaying a screen of bitmap data. We will first create a unique set of image tiles and export those tiles as a PNG file. Next we will load those tiles into a map creation tool (Mappy) and use them to create a screen for a Pac-man style game. We will use a custom Mappy (.lua) script I wrote, especially for this tutorial, to export the screen data as XML. When we finally get to Flash, well write a class that loads the PNG tiles, loads the XML map data, and displays a bitmapData representation of the screen we create.
There are quite a few steps involved, so I will do a moderate amount of explaining, while also providing files to download and use.
Step 1: Creating a tile sheet.
A tile sheet is basically the same as any other image, but it is set up in a unique manner. Our tile sheet will be 512 pixels in width, and 64 in height. This will allow us to have 2 rows of 16 32×32 tiles to use. I won’t go into exact details on creating tiles because the scope of this tutorial is based around programming and not graphic design. In any case, here are the basic steps I took to create my tile sheet.
1. I opened up Fireworks and created a new image 512×64.It can be up to 512 pixels in height, but I already have an idea of how many tiles I’ll next and 64 is going to be enough. Why max 512×512? This gives us 16×16 or 256 images possible in out tile sheet. Also, a 16×16 grid is pretty easy to deal with for me (math-wise)and for computers.
2. I created a new image the size 32×32.
3. I set the the canvas background color to transparent and zoomed in on the image.
4.Using the pencil tool I edited each of the individual pixels.
5. When I felt I was complete with an image tile, I copied it to the 512×64 blank tile sheet. image. I was careful to put the first image at 0,0, and the next at 32,0, etc.
6. When I was done with my map, it looked like this:

I saved this as tiles.png.
Along with the background maze tiles, I also created tiles to represent the sprites for the game. I have two frames for a Pac-man like character, frames for dots to eat, ghosts, and lastly a two frame animation for power pellets. One of the reasons I am using a .png file is to preserve the transparency of the sprites and also have my choice of millions of colors (not that I used more than 20 in this example). This one tile / sprite sheet will be enough for the entire game. Since we won’t be using the ghost or Pac-man characters yet, we’ll refer to this as our tile sheet rather than out sprite sheet. BitmapData in Flash deals with both of these (sprites and tiles) same though, so really one file is capable of handling both tiles an sprites. It’s all just bits, and how you intend to use them.
Step 2: Creating a maze out of the tile map.
One of the most useful weapons in the arsenal of any game developer is a good map editor. Now, as a Flash programmer, you can pretty much make one of these for your self, but I like to rely on a great map editor called Mappy. The basic version of Mappy is free, but I highly suggest spending the $19.00 it costs to register the full version.
Details on Mappy can be found at The Mappy Web Site. I also am not going to go into full details on using Mappy. I will go over the very basic steps that anyone can use to create a level map with Mappy. We are going top use the tiles.png tile sheet we created. The latest version of Mappy needs an extra .dll to use png files properly. So you should take careful note that there is a .zip file of DLLs that will need to be downloaded and copied to the Mappy folder.
Once you have downloaded, unzipped, and placed the Mappy files in a folder (there is no official install program), you will need to unzip the “libpng12.zip” (which can be obtained here) to use .PNG files with the program.
Now let’s create out maze tile map.
1. Open Mappy.
2. In the [File] menu, select New Map and set the tile size to 32×32 and the map size to 15×15. The Pacman style level we will create can be easily created in 480×480 or 15×15 32 pixel width and height tiles.
3. Mappy will warn you that you will now need to import a tile sheet into the program to use. In the[File] menu choose Import and then select the tiles.png file we created in step 1.
4. The tiles will show up in the right-hand window. Take close look at the tile sheet and you will notice that a blank tile has been inserted at the beginning of the tile sheet. This is useful for deleting tiles from your map, but isn’t an actual tile in your sheet. This will be important when we need to export our data for use in Flash.
5. I used the tiles to create a map that loops like the:
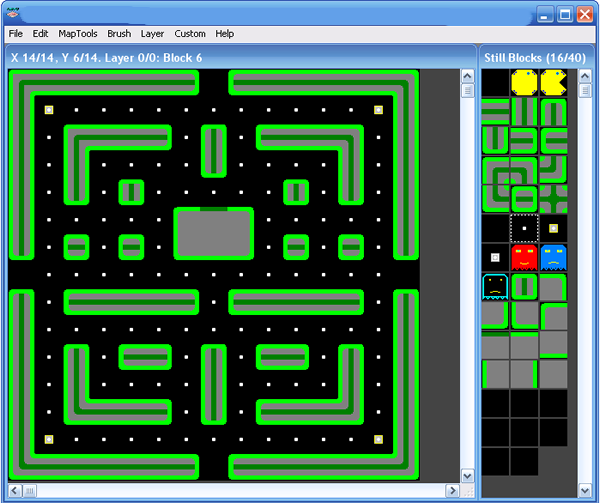
(Mappy showing the tile sheet on the right and the map I created on the left).
6. The next step is to save the file as “maze1.FMP”. This will save a file with both the created maze data and the tile sheet together so you can go back in later and edit or update it.
7. I am not a Mappy expert, so there are probably other ways to accomplish the next task, but here is the method I used. We need to export the maze1.FMP data to a file that is usable in Actionscript. Since this tutorial is supposed to cover XML to some extent, that is the format I chose to use. Also, XML is a nice clean, standards based format that is easy to use with Actionscript 3. The problem is that Mappy cannot export directly to XML. At least not at first glance.
You might have noticed a [custom] menu in the Mappy menu bar. This menu contains scripts that have been provided that will allow you to perform custom tasks with Mappy. One of the current provided scripts is called: “Export Flash Actionscript”. This is a very useful script that will export out the code to create a multidimensional array in Actionscript from ourt maze1 tile map. This is a great script in of itself, and if we desired to use an array to hold our tile data, it would be sufficient as it stands. With some slight modifications, though, it can be changed to export out an xml file representation of that map.
The scripts are located in the “/luascr” that is in the root of the Mappy program folder. I copied the “Export Flash actionscript.lua” file, renamed it “Export XMl.lua” and created this file: Mappy export as xml script for you to download.
One you have downloaded that script, you need to unzip it into the “/luascr” folder.
Next, you will need to simply edit the mapwin.ini file in the root of the Mappy program folder. You need to add a line in the custom scripts section that resembles this:
“lua16=Export xml.lua”, under the “lua15=Set Text Strings.lua” (if that is the last one on the version you have). ” lua16 ” is simply is the next number in order sequence after the other scripts in the file.
Now we are ready to export the map data as xml.
- Restart Mappy, load in the “maze1.FMP” file, and then choose the “Export XML” option from the [custom] menu.
- The first thing you will see is a warning that what you are going to be exporting is simply a flattened version of the map, no animation will be exported.
- Click [OK] and then type in a name for the xml file. For this example, use “maze1”. It will add the .xml for you. If you add the “.xml” in yourself, you will have a strange looking file called “maze1.xml.xml”. This mostly has to do with my being a complete novice at “luascript”.
- Click on [save]
- Next it will ask you how much to adjust the map values. This is an important question because Mappy added that extra blank tile to the beginning of our tile sheet. Because of that, the actual map values are 1 greater than they will be when we use the original tiles.png file as our source for times in Flash. .
- For that reason, put a “-1” into this dialog box and click on the [OK] button.
- You will now have an exported xml file of the tile map.
The XML looks like this for the first row
[cc lang=”javascript” width=”550″]
[/cc]
Step 3. Using the tile sheet and tile map in Flash CS3 with AS3
The next step is to take the maze.xml and the tiles.png file and put them in the same folder. In this same folder (for ease of this simple tutorial) create a new Flash CS3 file called. tileMapExample.fla
Change the document class to TileMapExample (in the document properties window).
Create a new AS3 script file called TileMapExample.as.
Here is the first section of code for the TileMapExample class: [cc lang=”javascript” width=”550″]package {
import flash.display.MovieClip;
import flash.display.Bitmap;
import flash.geom.*;
import flash.display.BitmapData;
import flash.display.Loader;
import flash.net.URLRequest;
import flash.events.*;
import flash.net.*;
public class TileMapExample extends MovieClip {
[/cc]
First we create a generic package to house our class. If this was an actual game called Maze Man, I might create a package com.8bitrocket.mazeman and then add all of the mazeman classes to that package. I would still keep the .fla in the root and maybe place the .png and .xml files in folders called /gfx and /maps. In any case for this relatively simple example, all of the files will be in the same folder.
Next we import in the packages and classes we will need to accomplish loading assets, using xml, and displaying bitmaps from tile sheets. Play special attention to the loader classes because loading assets has been completely changed in AS3.
The final line is our class declaration. This class will extend MovieClip because it is actually the root document class of the .fla file. Also, this makes it easy to use it as a base container for our example maze screen.
[cc lang=”javascript” width=”550″]
private var loader:Loader;
private var xmlLoader:URLLoader; //xml loader
private var mazeData:XML; //holds xml data
private var aTileMap:Array=new Array();//holds the final array of tile data
private var screenBitmapData:BitmapData;//holds the actual screen to display
private var tilesBitmapData:BitmapData;// holds our loaded in tile sheet
private var screenBitmap:Bitmap;// display object for screenBitmapDat
private var mapRows:int=15;/holds the length of the mapin rows
private var mapCols:int=15;//holds the width of the map in rows
private var tileSize:int=32;
private var screenWidth:int=480;
private var screenHeight:int=480;
public function TileMapExample() {
//load in tile sheet image
loader = new Loader( );
loader.contentLoaderInfo.addEventListener(Event.INIT,tilesLoadInit);
loader.load(new URLRequest(“tiles.png”));
}
[/cc]
Here, we begin to instantiate all of the variables we will need to this example.
The Loader variable will hold the loaded data for our tiles.png file.
The xmlLoader variable will hold the loaded in xml data from maze1.xml.
The mazeData variable will hold the xml representation of the loaded in xml data.
The aTileMap variable will contian an 2 dimensional array of tiles organized by rows, then columns in each row.
The
screenBitmapData variable will hold the bitmapData representation of our screen to display.
The tilesBitmapData variable will hold a bitmapData representation of the tiles.png loader (Loader var)
NOTE: The rest of this tutorial seems to have gone on vacation. I am looking for a back up. But, here is all of the source code for download:

Leave a comment