
Introduction
In this video I am going to describe some of the decisions and algorithms I am using to create my STOS game, Grief,
Grief is a classic arcade variant inspired by the arcade game Gorf, but it is not a port. The first level started with tutorials I was writing to show how an ST or other classic game developer might design the logic and rendering for a Gorf-like game using ideas from its Invaders Stage, but Grief will be its own game. It will contain 5 different stages in the arcade shooting player ship sliding style of game represented by Gorf, Galaxian, and Galaga. I don’t plan to copy any of those games though but combine elements found in those and others to make 5 new unique stages.
We are first going to create a game loop that will run our logic and then create the actual logic. In this session I will demonstrate the final choice I have made for an enemy formation rendering solution, place that formation on the screen and also place a joystick controllable player ship on the screen.
This is my first real step in making a game since 2010 and my first programming on the ST since 1989. I have been playing with STOS and making tutorials and some half or less than half finished clones, but the buck finally stops here.
This isn’t a tutorial, but it is a learning opportunity for both the viewer and this budding home brew programmer. I will show code and talk about how I decided to solve problems during the development. The goal is to evolve my code and ideas and I progress through the game and other games.
Code and algorithms
will be shared
What’s the ultimate goal here?
The goal is to make Atari ST and STE games, and optimize them in both STOS, GFA Basic and beyond. In STOS we will incorporate extensions that help with rendering leaving STOS to be more of a LUA like scripting engine, and when we get to GFA, we have some of the same options with Sprite Works 2.0. These allow us to focus on game play, graphics, sounds and simple optimizations rather than slogging through Assembly language as the bulk of the behind the scenes code has already been created in assembly for us.
In Grief, we are going to make a multi-stage shooter similar to Gorf. Not a copy or a port, but similar. But, I also will be taking ideas from other 8 and 16 bit games.
For now, we are going to use STOS and the MissingLink extension for the ST and we are also going to add in-game MOD music playing for the STE. We’ll use chip effects for game play sounds and either a Sampled tune or a Mod tune for the title music.
OK
Let’s get Started
Game Design
In part 3 of our STOS Basic series, we discussed the various methods to render an enemy formation on the screen. In that lesson we decided that Missing Link Bobs would be the best way to render the formation. Neil Halliday saw this and added one more rending type that I had forgotten about. He suggested that we use a Missingike scrolling MAP to render the formation. I thought this was a brilliant idea so I went ahead and created a set of map tiles and a landscape map using missing link utilities. I also switched the game sprites from the standags Gorf Invaders to some from Ari Feldman’s SpriteLib GPU.
I have created a set of sprites, w,ll, really one single sprite right now, but there will be more for moving objects.
Here is that single sprite right now:
This is the player ship and by running this standard sprite file through Missinglink Make utility I have turned it into a set of pre-shifted bobs for game play.
I have also created a file of “tiles” for use with the enemy formation
Using the STOS sprite utility I made a set of sprites and then turned them into world tiles with the same make utility I used for the player ship. This utility created tiles that can be used on a 4-way scrollable map.
The formation we want to use for Level one look like this:
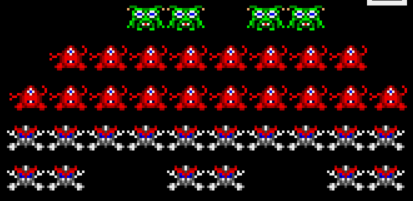
The width of this formation is 160 or 10×16 tiles
To make this scroll left and right, we have to add blank tiles on the left and right so we can simulate the game scroll
| 128 px | Formation 160 | 128Px |
So our map looks like this
| 128 px | 160 px | 128 px |
First, let’s take a look at the tiles I have created for use with the Map Designer. Eddy.
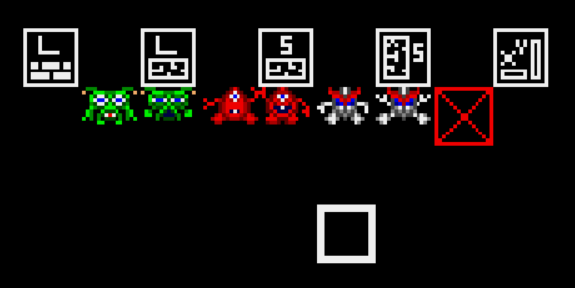
The top row of icons are for loading and saving in the map designer and the second row are the map tiles that I have loaded in.
The first Tile needs to be blank so it can be used as an eraser. Then there are two frames of animation for each invader. I will place the frame on as a placeholder and I will write code to flip between the frames in the next video.
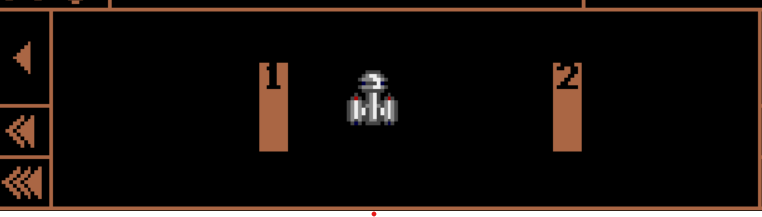
Here is the map I created. For the scrolling formation.
The scrolling map is 28 tiles wide by 12 high.
I have added this red X box graphics tile around the outside so when I display it on the screen and scroll it I can see when I have moved too far to the right or left.These tiles will not be visible to the player

Game Code
Let’s start with our game loop. We are going to split out game code, using Neil Halliday’s VSCode plug-in, into 5 sections using the Label and Gosub design pattern
It will look like this:
rem *** Main ***
gosub @systemSetup
gosub @loadmainData
gosub @resetGame
gosub @initLevel
gosub @runGame
System Setup will contain some vert basic setting and defaults that are needed to get out game started
Load Main Data will load in the memory bank files we need for all game levels and set the palette
Reset Game will allow use to create the first game and reset for a new game once a game over for the player
Init Level will allow us to set level specific information such as enemy formation and other specifics
Run Game will contain the main loop for our game code
Eventually, we will be adding more main labels and Gosubs as we progress through the code.
System Setup
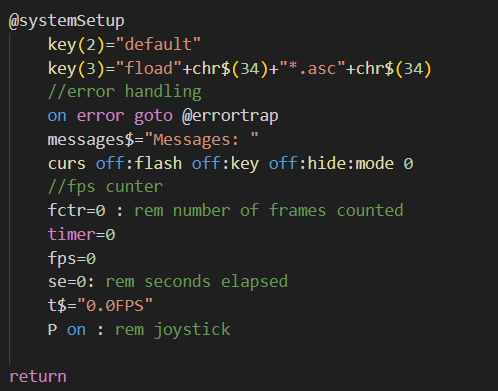
As stated before, this is used to set up some basic game environment for error trapping and the fPS counter. We also turn off the cursor, color flash, key click hide the mouse, set the screen to mode 0
LoadMainData,
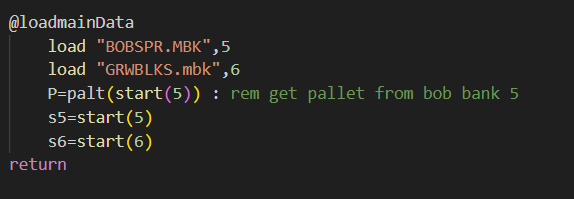
In this section we first load the bobsp.mbk file, which right now only contains the player ship pre-shifted graphics. We also load the gwblks.mbk which contains the pre-shifted world tiles representing the enemy for the formation
We also pick the palette from memory bank 5, and set pointers to the start of both of these memory banks.
ResetGame
@resetGame
    m$="": rem debug messages
    lvl=1: rem level
    scr=0: rem score
    hlth=3: rem health
    wpn=1: rem weapon
    mdx=1: rem map dx
    mdy=0: rem map dy
    pbob=0: rem player bob
    px=100: rem player x
    py=180: rem player y
    pdx=2: rem player dx
    pdy=0: rem player dy
    dim pm(10): rem player missiles 0=off 1=on
    dim pmx(10): rem player missiles x
    dim pmy(10): rem player missiles y
    pmdy=-4: rem player missile speed


    exg=FALSE: rem exit game


     m$="Press fire"
    text logic,0,varptr(m$),1,20


    c=false: rem wait to continue
    repeat
        if p fire(1) then c=true:messages$=messages$+"fire!"
    until c=true
    wipe logic


return

In the reset game we are setting all of the variables back to their original values for a new game.

First we have the m$, which is used for debug messaging.
The lvl, scr, hlth, wpn are used for the game level, player score, player health and player ship weapon level.

Mdy and mdx hold the delta or change for each direction on each frome  for the map scroll. In level one, the map will simply scroll back and forth or left and right on the screen.

Px, py,podx and pdy hold the player x and y positions and the change in those positions when the joystick is moved left or right, up or down. There is no up or down movement in level one yet, so pdy=0.

Next we have 3 arrays to hold data for the player missiles. We will not be adding those this time, but we have 3 parallel arrays to hold the on/or off value PM, the x position PMX, and y position, PMY of each missile.

PDMY is the speed or current delta Y of the player missiles.

EXG is set to false. Will we use this the exit the game loop when it is set to true

The rest of the code places the “press fire” message on the game screen, waits for a fire button  press and then clears the screen with the missing link wipe command.
IntiLevel
@initLevel
    if lvl=1 then @level1Setup else  @level1Setup
return
Level1Setup
@level1Setup
    messages$=messages$+" level1 setup begin"
    load "GR1MAP.MBK",7
    s7=start(7)
    MX=16:MY=16: rem map x and y
    world 0,0,320,96,0,1:rem set world
    messages$=messages$+" level1 setup end"
    exg=false
return
The first thing we need to do is load a level specific information, in this case, we simply load the world map, GR1MAP.MBK into memory bank 7 and then set a pointer to start of this memory bank.
The MX=16 and MY-16 set the start of the map display to the second row and second column so we won’t see the red box border for debugging purposes
The WORLD command is specific to the missing link, it creates a scrollable world with a display window of 320 x 96 which is the entire screen width but only 6 tiles high.
RunGame
@runGame
    //messages$=messages$+" run game  begin"
    logic=back
    repeat
        gosub @checkInput
        gosub @gameUpdate
        gosub @gameRender
        //messages$=messages$+" after render"
    until exg=TRUE
    //messages$=messages$+" after until exg=true"
    if exg=TRUE then :  goto @errortrap
return
RunGame is the MEAT of the process. Now that everything has been set up for the level, this sets the game loop running.
On every frame we ant to
- Checkinput
- Update values based on input of other mechanics like patterns, missiles fire, etc
- Render everything to the screen
We are first setting logic=back, which is needed so we can draw everything to the background / logic screen and then use page flipping to quickly set it to the physical screen before we render. As you may recall, this bypasses the standard STOS sprite rendering routines.
CheckInput
@checkInput
    //messages$=messages$+" check input"
    if P left(1) then px=px-pdx
    if P right(1) then px=px+pdx
    //if p fire(1) then
return
Currently, this function looks for the player joystick pressed and adds or subtracts the PDX value from the player px value. We might move the actual addition and subtraction to the update function, but for now it will be here for ease of use.
GameUpate
@gameUpdate
    //update map formation position
    mx=mx+mdx
    my=my+mdy
    //check formation bounds
    if mx <=16 then  mdx=1
    if mx >=112 then mdx=-1


    //check player bounds
    if px <=0 then px=0
    if px >=300 then px=300
return
The game update function right now does only two things, it moves the formation by scrolling the map back and forth on the screen. When doing this, it check to see if the formation has moved too far left or right and then starts the movement in the opposite direction
The second thing it does is make sure the player cannot move off the screen by checking its px and py values. And setting them back to the max or min value if needed.
GameRender
@gameRender
    //clear last player position
    wash logic,x,97,320,200
    //messages$=messages$+" render"

    //render formation map
    world logic,s6,s7,mX,mY,0


    //render player
    bob logic,start(5),PBOB,PX,PY,0


    rem FPS
    inc fctr: rem inc the frame counter


    rem if 4 second has elapsed
    if timer >=50  then inc se:timer=0
     rem fps=number of frames / number of seconds = fps.


    if se>5 then fps=fctr/se: t$=str$(fps)+
    "FPS" + chr$(0):text    logic,0,varptr(t$),1,20
    cm$=str$(mx) + "," + str$(my) + chr$(0):
    text logic,0,varptr(cm$),1,21
    screen swap:wait vbl
return
If the game loop was the meat, then this is the actual steak and frites of what I am doing today.
First we call the WASH function to clean everything under the scrolling map. We do this because the map of the formation will clear the entire top of the game screen a;ready, up to 320, x 96 and we don’t want to waste cycles doing it 2x.
Next we render the formation with a second or “overloaded” version of the World command. This version takes s6, which are the tiles, and applies them to s7, which is the map and displays the map starting at mx,my to the location 0,0 locat=on on the logical screen.
We then render the player ship with the BOB command from the missing link and update our frame counter.
That’s it, let’s see it in action in the interpreter (see video above)
When we run game1.bas we get about 25 frames per second average, which is what we are looking for.
Now as a GEM TOS runnable file. (see video above)
The compiled version is also about 25 frames per second, so we are looking pretty good to keep this as a very playable game on a standard ST with no extra chip help. We’ll add more and more to keep it above 20 FPS and then add in a few STE upgrades for sound and possibly blitter support.
Next time, we will add collisions, player missiles, some status bar values and more.

Leave a comment